
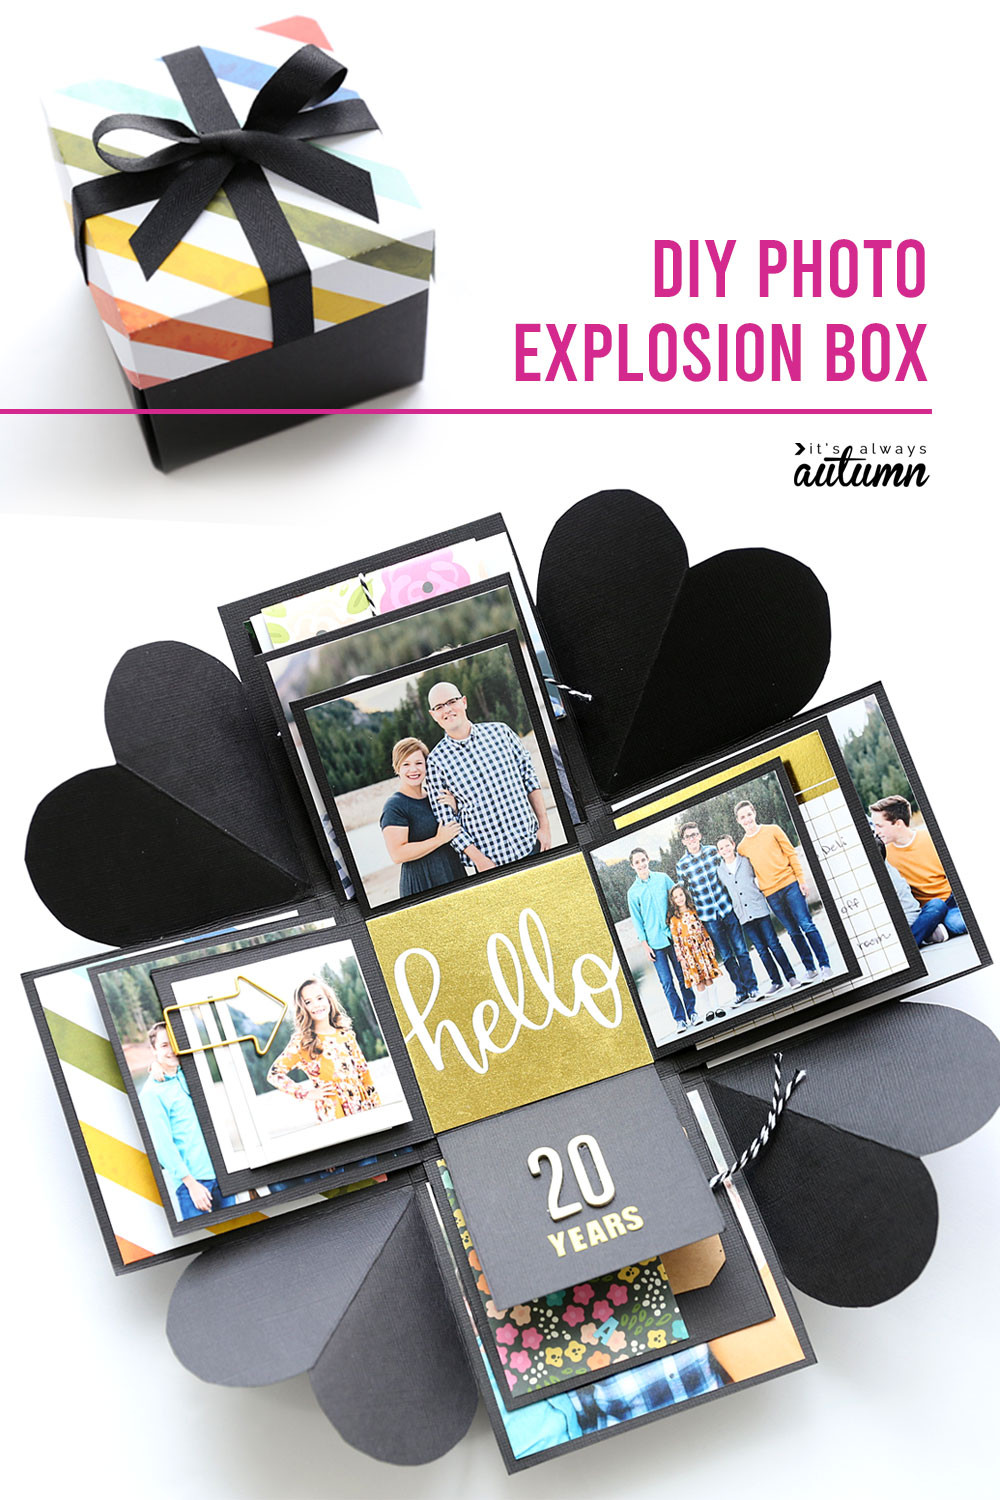
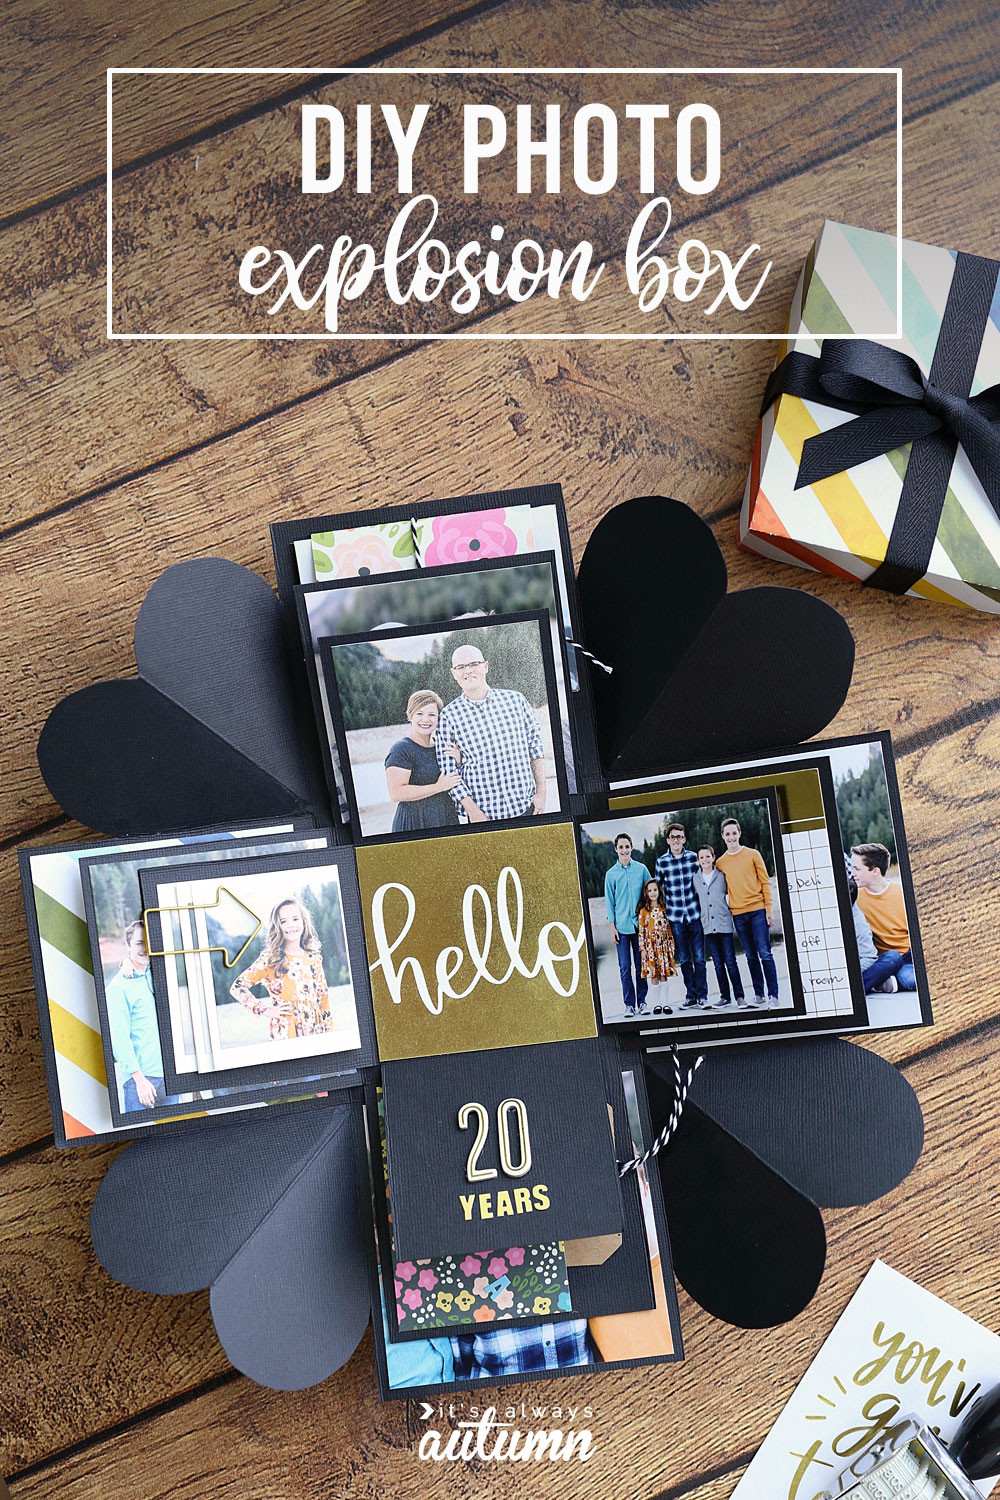
Creating a memorable and heartfelt gift doesn’t always require a store-bought item. Sometimes, the most cherished presents are those made with your own hands. If you’re searching for a unique way to express your love and appreciation, look no further than the Explosion Gift Box. This delightful DIY project transforms from a seemingly ordinary box into a cascade of memories and sentiments when the lid is lifted.
 DIY photo explosion box that opens up when you take the lid off
Years ago, for our twentieth anniversary, my husband and I planned a trip instead of exchanging gifts. However, I still wanted to give him something special, something that came from the heart. That’s when I discovered the magic of the explosion gift box. Filled with photos and personal notes, it was the perfect way to encapsulate our journey together.
An explosion gift box is more than just a craft; it’s an experience. Imagine a beautifully crafted box, unassuming at first glance.
 Learn how to make this cool DIY explosion box card.
But upon removing the lid, it “explodes” outwards, revealing layers of photos, heartfelt messages, and charming decorations. While I had seen these captivating creations online, crafting one myself was a first. Using cardstock and scrapbook supplies, the process was surprisingly enjoyable. This handmade gift is ideal for a multitude of occasions – birthdays, anniversaries, graduations, weddings, or even as a thoughtful Christmas present. It’s a wonderful way to preserve and share cherished memories in a truly unforgettable way.
The Simplicity of a DIY Explosion Gift Box
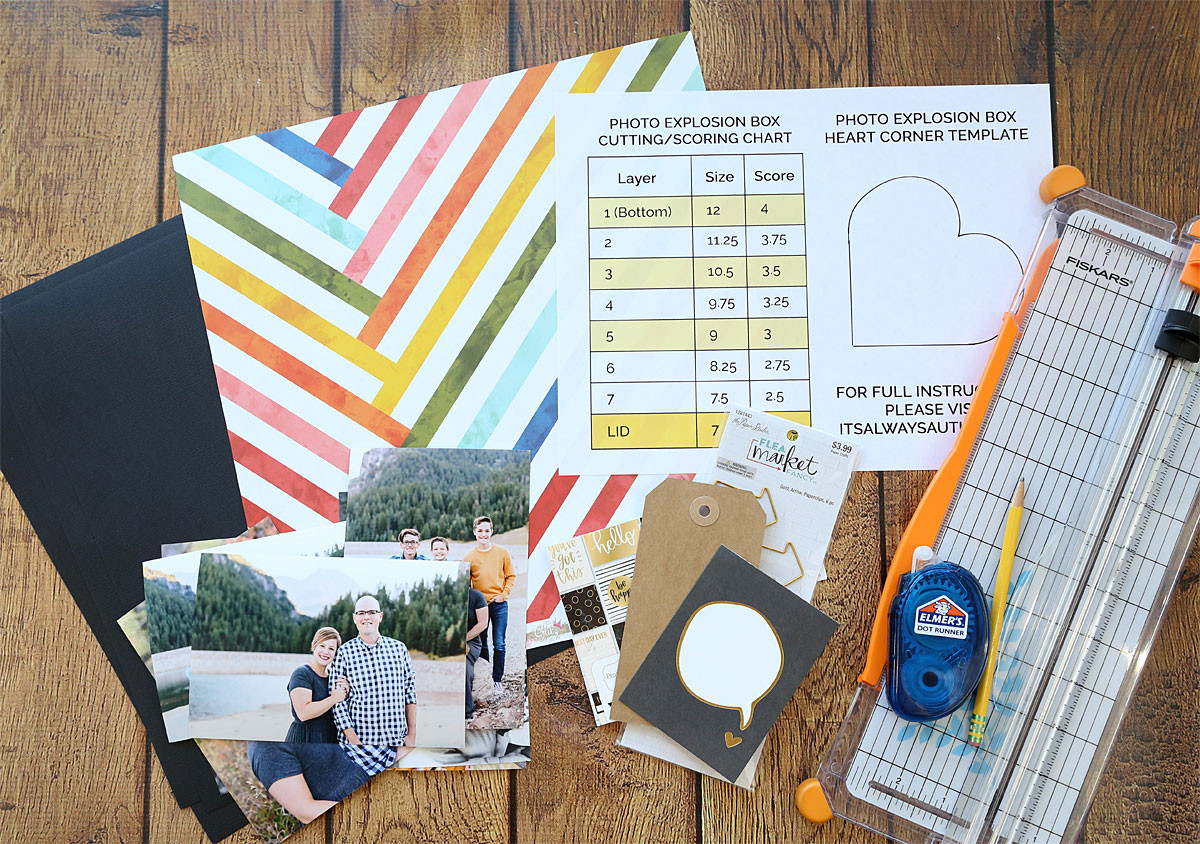
While an explosion gift box may appear intricate, the construction is surprisingly straightforward. To simplify the process, I’ve designed a printable cutting and scoring guide that provides precise measurements for each layer. This guide also includes a template for creating the decorative hearts for the base layer corners. Additionally, a printable lid template is available to minimize measuring. To further assist you, I’ve created a step-by-step video tutorial that visually demonstrates the entire assembly process.
Explosion Gift Box Video Tutorial
Words can only do so much to convey the captivating nature of an explosion gift box. To truly appreciate its dynamic unfolding, I encourage you to watch this brief video showcasing the box in action:
Gather Your Explosion Gift Box Supplies
 Explosion box supplies
To embark on your explosion gift box crafting journey, you’ll need these basic supplies, readily available at most craft stores or larger retail stores:
- 12×12 inch Solid Colored Cardstock: One sheet for each layer of your box.
- 12×12 or 8.5×11 inch Printed Cardstock: For creating the lid and adding decorative flair.
- Adhesive: Your preferred paper adhesive – glue sticks, tape runner, or liquid glue.
- Paper Trimmer with Scoring Blade: A paper trimmer with a scoring blade is ideal for precise cuts and scoring. Alternatively, you can use a craft knife and ruler for cutting and a scoring tool for scoring.
- Photos: Prints of your treasured memories to personalize the box.
- Embellishments (Optional): Let your creativity shine! Scrapbook supplies like stickers, ribbons, decorative paper, and small mementos can add extra charm.
Print Your Template and Cutting Guide
Before you begin assembling your explosion gift box, ensure you have printed the necessary templates:
Explosion Box Cutting + Scoring Chart
Explosion Box Lid Template (Print directly onto the back of your chosen lid cardstock)
It’s crucial to print these templates at 100% or full size to ensure accurate dimensions. Each template includes a test square that should measure exactly 1 inch when printed correctly.
The Cutting Guide provides dimensions for up to seven layers, allowing for a truly expansive explosion gift box. My example box uses three layers, utilizing the dimensions highlighted in yellow on the guide. However, feel free to add more layers to accommodate a wealth of photos, notes, and mementos. A seven-layer box offers ample space for a comprehensive collection of memories.
The Cutting Guide presents two numbers for each layer: the first indicates the required cardstock sheet size (always square), and the second specifies the distance from each edge to measure and score. It also includes cutting dimensions for the lid if you prefer not to use the printable template.
Step-by-Step Explosion Gift Box Instructions
Below is a printable instruction card summarizing the steps for creating your own photo explosion gift box. For a visual walkthrough of each step, refer to the eight-minute instructional video located at the bottom of the card!
Learn how to make a cool explosion box full of photos and notes for a fun DIY gift. Use our printable template and cutting chart to make it easy.
Supplies Checklist
- 12×12 inch Solid Colored Card Stock (1 sheet per layer)
- 1 sheet Printed Card Stock
- Adhesive
- Paper Trimmer with Scoring Blade (or alternatives)
- Photos
- Embellishments (optional)
Assembly Guide
-
Prepare Cardstock: Print the cutting guide and decide on the number of layers for your box. My example uses three layers with light yellow highlighted dimensions. Cut your solid cardstock to the dimensions specified in the cutting guide.
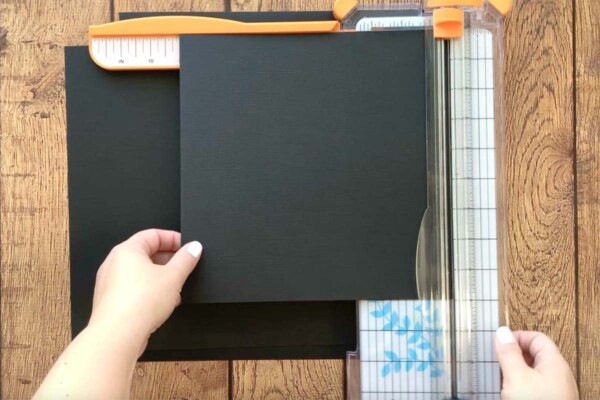 Cutting card stock as directed on cutting guide.
 -
Score the Layers: Locate the scoring measurement for the largest cardstock piece. Measure inward from one edge of the cardstock and score (e.g., 4 inches in on a 12-inch piece). Rotate the paper 90 degrees and repeat. Continue this process twice more until all four sides are scored. This will divide the sheet into nine equal squares. Repeat for all cardstock layers.
-
Fold Along Score Lines: Fold the cardstock along all scored lines. You should now see nine equal squares on each sheet, with folds creating a grid.
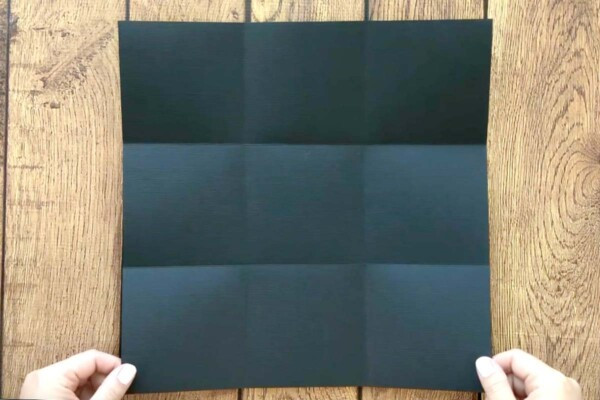 Cardstock folded along scored lines to create 9 equal size boxes.
 -
Create Diagonal Folds (Largest Layer): On the largest cardstock piece (base layer), make a diagonal fold through each of the four corner squares. These diagonal folds should be “mountain” folds (folding downwards), while the grid folds are “valley” folds (folding upwards). The video tutorial provides a clear visual demonstration of this step.
-
Cut Heart Shapes (Largest Layer): Using the heart template from the cutting guide, trace and cut out heart shapes from each corner square of the largest cardstock piece.
 Cardstock with heart shapes cut from each corner box.
 -
Assemble Layers: On the remaining cardstock pieces (for inner layers), cut away the corner squares completely. Layer the largest piece (base) at the bottom, then center the next largest piece on top and adhere them together only in the center square. Repeat this layering and adhering process for any additional layers.
-
Prepare Lid: Print the lid template on the back of your printed cardstock (trim cardstock to printer size if needed). Cut along the solid lines of the template and score and fold along the dashed lines. At each corner, cut along the solid line up to the point where the dashed lines meet, from only one side of the corner. This creates a flap for gluing the lid together, not removing the corner entirely.
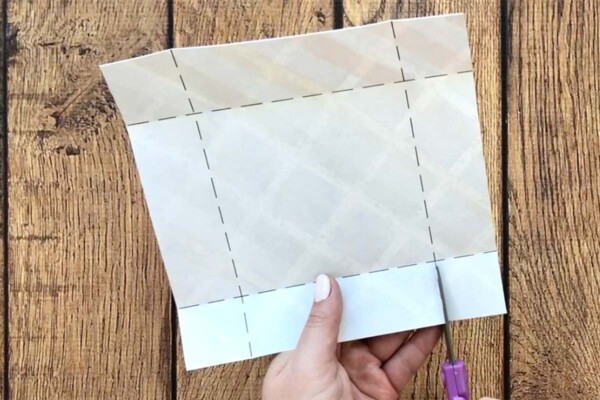 Lid cut and scored; cutting a flap at each corner.
 -
Assemble Lid: Fold over the flap at each corner, apply adhesive, and press to adhere the flap to the adjacent side, forming the box lid.
-
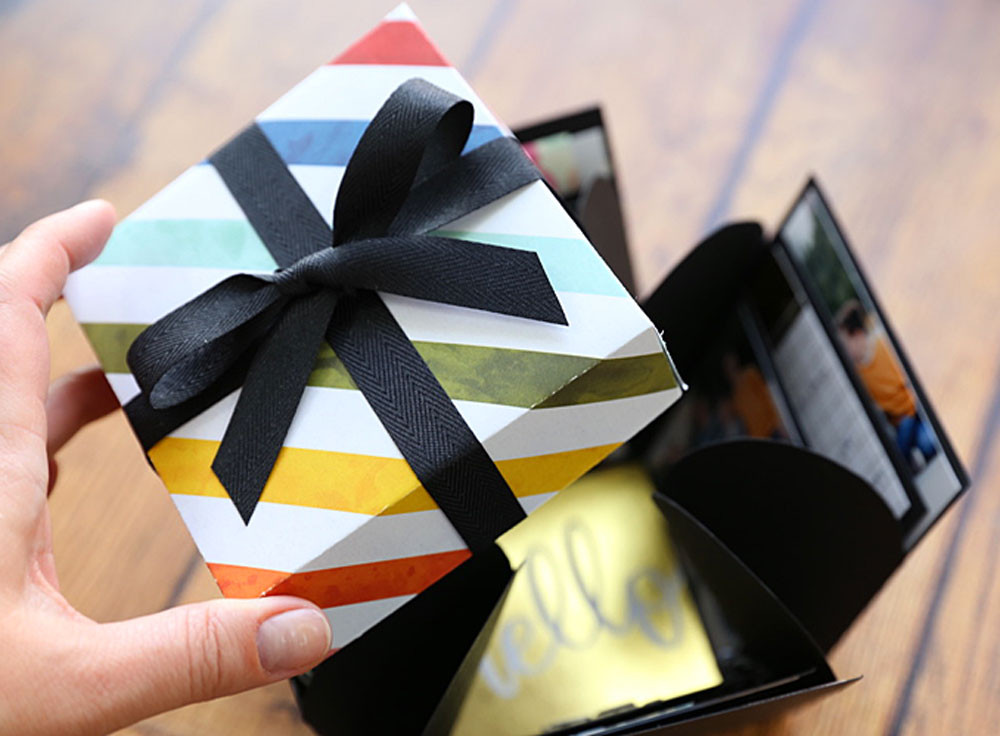
Decorate: Unleash your creativity and decorate the box as desired. Add photos, notes, embellishments, stickers, ribbons – personalize it to reflect the recipient and the occasion. Once decorated, gather the sides of the box upwards, folding the heart corners inwards, and place the lid on top to close.

Helpful Tips
If you lack a paper trimmer with a scoring blade, alternative cutting and scoring methods are available. A ruler and craft knife (used carefully) or even scissors can be used for cutting. For scoring, employ a ruler and the back of a butter knife or a dedicated scoring tool.
Video Guide
[Link to Video Tutorial Here – Replace with actual link]
Personalizing Your Explosion Gift Box
Once your explosion gift box structure is complete, it will resemble this:
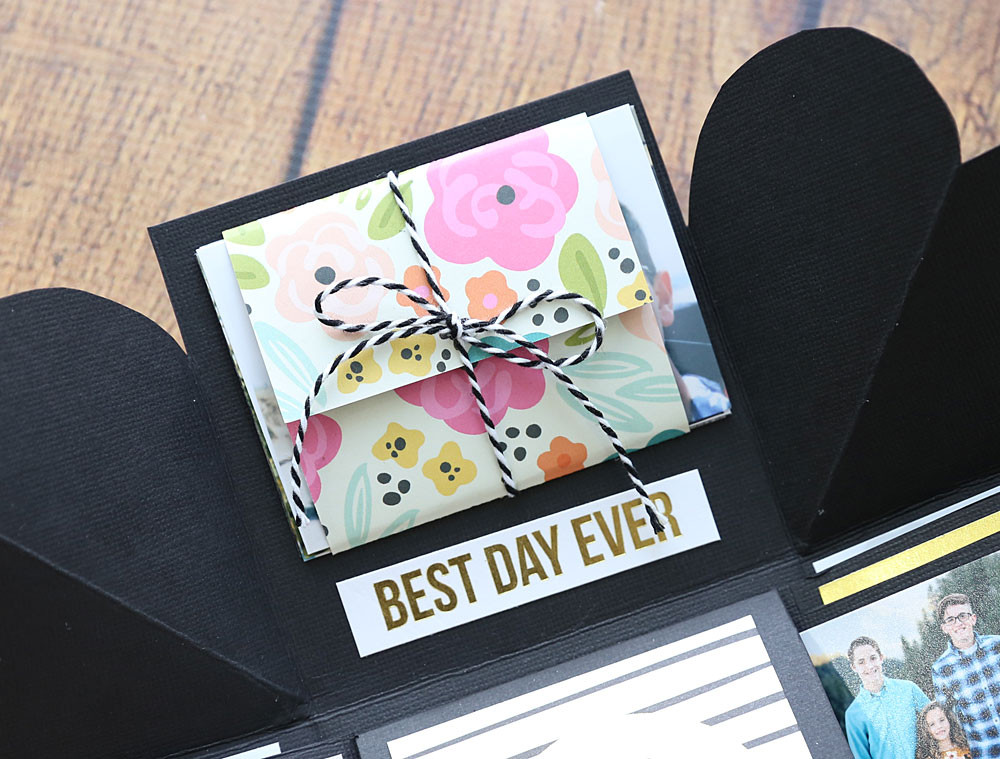
Decorating is where the real magic happens! With an outer layer and inner layers, there’s ample space for personalization. I opted for a relatively simple design for my husband’s box, incorporating photos, notes, and a few pre-made notecards from the craft store’s scrapbook section. Inside the box, both sides of the flaps can be decorated, ensuring the recipient discovers memories and messages at every turn.
For photo placement, I cut my photos slightly smaller than the “score” measurement for each layer. Photos for the bottom layer were 3.75 inches square, middle layer photos were 3.25 inches square, and top layer photos were 2.75 inches square.
 DIY photo explosion box that opens up when you take the lid off
To add interactive elements, I incorporated an accordion-folded strip of cardstock that unfolds to reveal small photos of our children.
I also used a strip of printed cardstock, folding it around wallet-sized photos of my husband and me. Secured with twine and glued to the base layer, it added another layer of visual interest.
 Explosion gift box example.
Feel free to incorporate as many or as few interactive elements as you desire. Online resources like this tutorial offer numerous ideas for pockets, boxes, and other interactive features, along with cutting and folding dimensions. This video provides a wealth of inspiring examples, though it lacks a step-by-step tutorial.
Explore more handmade gift ideas with these posts:
The Ultimate List of Photo Gifts
25 Quick Handmade Gifts (15 Minutes or Less)
Top 20 DIY Gifts for Men
Creating Photo Letters: A Simple Picture Collage Craft
Personalized Photo Candles: A DIY Guide