
Are you looking to personalize your gifts with custom-made tags? How To Make Gift Tags On Word is simpler than you think, and at lawyergift.com, we’re all about adding that extra touch of thoughtfulness to your presents. This guide will walk you through the process of creating beautiful, professional-looking gift tags using Microsoft Word, perfect for adding a special message to your gifts for lawyers and legal professionals. Discover creative ideas, step-by-step instructions, and tips for designing unique gift tags that will impress any recipient, ensuring your gift stands out with a personal and professional flair.
1. Why Create Gift Tags on Word?
Creating gift tags on Word offers a blend of simplicity, customization, and cost-effectiveness. Instead of relying on generic store-bought tags, you can design personalized tags that perfectly match the recipient’s personality, the occasion, or the theme of the gift. Here are several reasons why learning how to make gift tags on Word is a valuable skill:
- Personalization: Tailor each tag with unique messages, fonts, and designs to reflect your relationship with the recipient.
- Cost-Effective: Avoid the expense of purchasing pre-made tags, especially if you need a large quantity.
- Creative Control: Experiment with different shapes, colors, and layouts to create tags that are truly one-of-a-kind.
- Convenience: Microsoft Word is widely accessible, making it easy to create and print tags from the comfort of your home or office.
- Professional Touch: For corporate gifts or law firm events, custom tags can reinforce branding and add a polished, professional look.
Gift tags are a small detail that can make a big impact, especially when giving a gift to a lawyer. At lawyergift.com, we understand the importance of thoughtful gifting, and custom-made gift tags are a wonderful way to show your appreciation.
2. Understanding the Basics of Microsoft Word for Gift Tag Design
Before diving into the step-by-step instructions, it’s important to familiarize yourself with the basic features of Microsoft Word that you’ll be using for gift tag design. Understanding these tools will allow you to unleash your creativity and create truly unique tags:
- Shapes: Word offers a variety of shapes, including circles, rectangles, stars, and banners, which can be used as the base for your gift tags.
- Text Boxes: Use text boxes to add personalized messages, names, or quotes to your tags.
- WordArt: Create eye-catching titles or headings with stylized text effects.
- Pictures: Insert images, logos, or graphics to enhance the visual appeal of your tags.
- Colors and Fill: Customize the colors of your shapes, text, and backgrounds to match your desired aesthetic.
- Borders and Outlines: Add borders and outlines to define the edges of your tags and create a polished look.
- Page Layout: Adjust the page layout settings to optimize the printing of multiple tags on a single sheet of paper.
Mastering these basic features will empower you to create professional-looking gift tags that stand out and add a personal touch to any gift.
3. Step-by-Step Guide: How to Make Gift Tags on Word
Now, let’s walk through the process of creating gift tags on Word, step by step:
3.1. Open a New Document
Start by opening Microsoft Word and creating a new blank document. This will be your canvas for designing your gift tags.
3.2. Set Up Your Page Layout
To maximize your printing efficiency, adjust the page layout settings to fit multiple tags on a single sheet of paper.
- Go to the “Layout” tab.
- Click on “Margins” and select “Narrow” to minimize the margins around the edges of the page.
- Click on “Size” and choose your desired paper size (e.g., “Letter” or “A4”).
- Click on “Orientation” and select “Landscape” to allow for more tags to fit across the page.
3.3. Insert a Shape for Your Tag
Choose a shape to serve as the base for your gift tag.
- Go to the “Insert” tab.
- Click on “Shapes” and select your desired shape (e.g., a rectangle, circle, or star).
- Click and drag on the document to draw the shape to your desired size. You can adjust the size and proportions later.
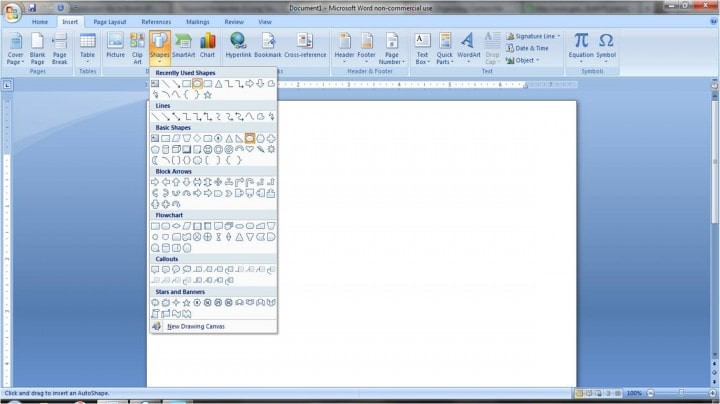 inserting a label shape in Microsoft Word
3.4. Customize the Shape’s Appearance
Make your tag visually appealing by customizing the shape’s fill color, outline, and effects.
- Select the shape you just inserted.
- Go to the “Shape Format” tab.
- Use the “Shape Fill” option to choose a solid color, gradient, texture, or picture for the tag’s background.
- Use the “Shape Outline” option to select a color, weight, and style for the tag’s border.
- Use the “Shape Effects” option to add shadows, reflections, or glows to the tag.
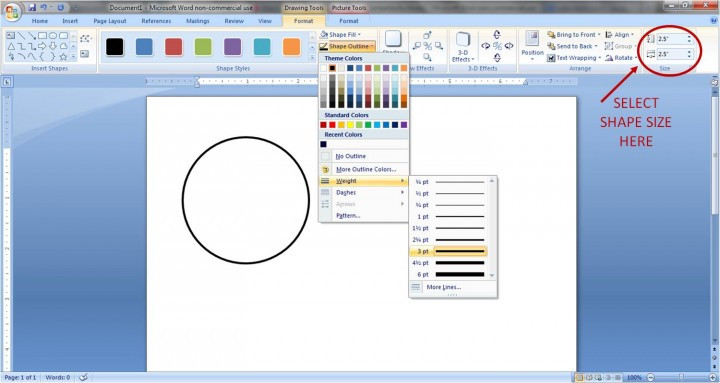 adjusting the fill and outline settings of the label in Microsoft Word
3.5. Add a Second Layer (Optional)
Adding a second, smaller shape on top of the first can create a layered effect and provide a clean surface for your text.
- Repeat steps 3.3 and 3.4 to insert and customize a second shape that is slightly smaller than the first.
- Position the second shape in the center of the first shape.
- Consider using a white or light-colored fill for the second shape to make your text stand out.
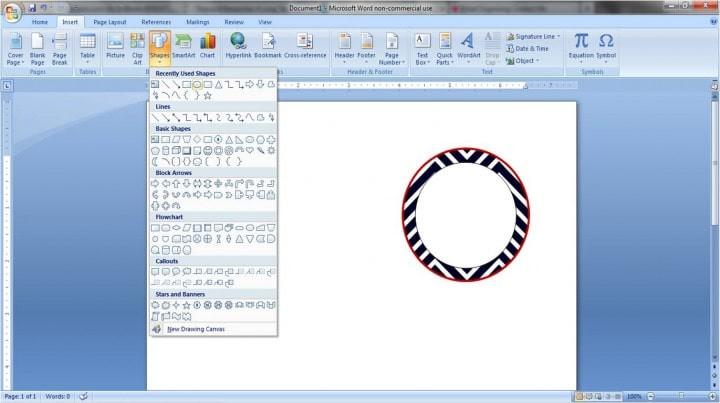 adding another layer to the label in Microsoft Word
3.6. Insert a Text Box
Add a text box to write your personalized message on the gift tag.
- Go to the “Insert” tab.
- Click on “Text Box” and select “Draw Text Box.”
- Click and drag on the document to draw a text box inside your shape.
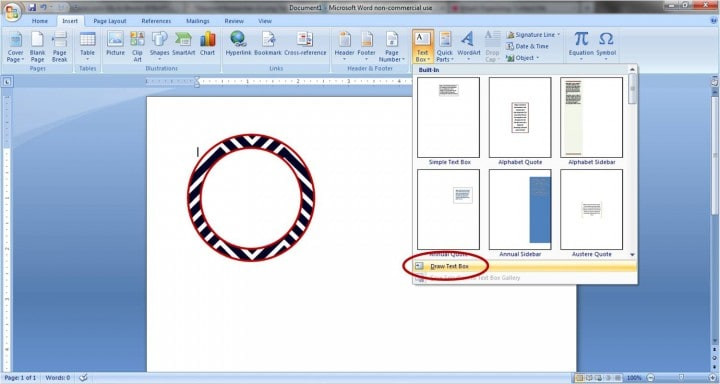 adding a text box to the circular label in Microsoft Word
3.7. Format the Text Box
Make the text box blend seamlessly with your tag design by removing its fill and outline.
- Select the text box you just inserted.
- Go to the “Shape Format” tab.
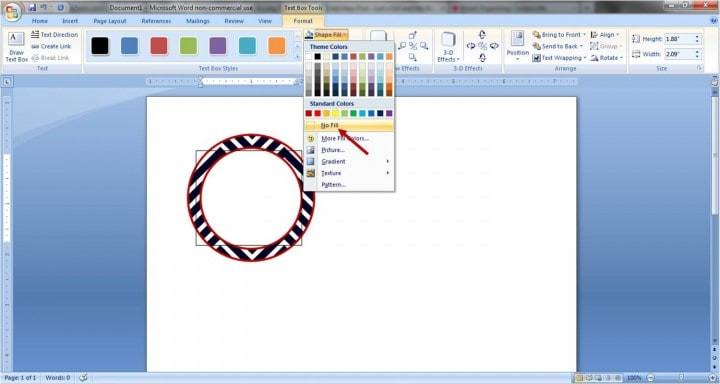
- Set “Shape Fill” to “No Fill.”
- Set “Shape Outline” to “No Outline.”
 changing the text settings
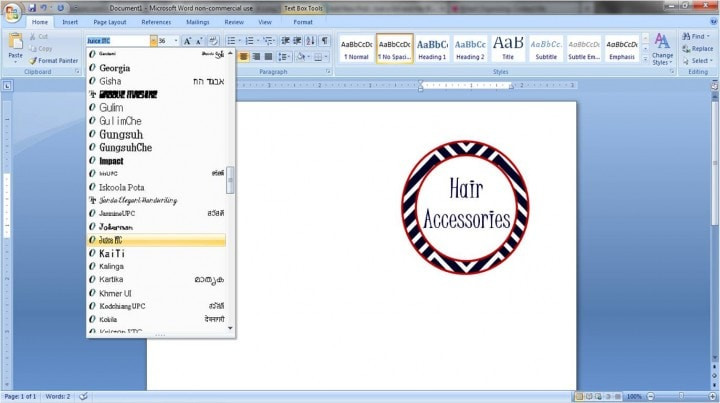
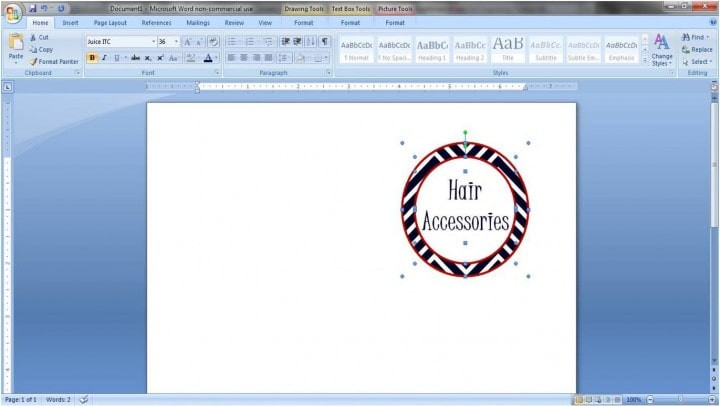
3.8. Add Your Text
Write your personalized message inside the text box.
- Click inside the text box to activate it.
- Type your message (e.g., “To,” “From,” “Happy Birthday,” or a custom greeting).
- Use the formatting options in the “Home” tab to change the font, size, color, and alignment of your text.
 adjusting the font on the label
3.9. Add a Hole for the Ribbon
To make your tag functional, add a small circle at the top where you can punch a hole for the ribbon or string.
- Go to the “Insert” tab.
- Click on “Shapes” and select “Circle.”
- Draw a small circle at the top of your tag.
- Set the “Shape Fill” to white or a color that contrasts with the tag’s background.
- Set the “Shape Outline” to the same color as the tag’s border, or to “No Outline.”
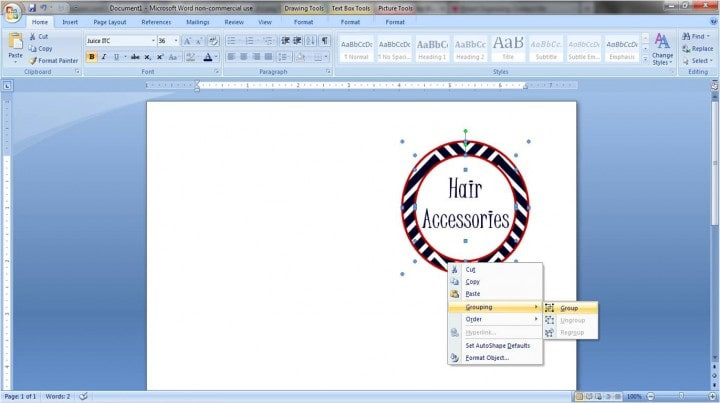
3.10. Group the Elements
To make it easier to move and copy your tag, group all the elements together.
- Hold down the “Ctrl” key (or “Command” key on a Mac) and click on each element of your tag (the shapes, text box, and hole).
- Right-click on the selection and choose “Group” > “Group.”
 grouping the label together in Microsoft Word
3.11. Copy and Paste to Fill the Page
Now that you have created one complete gift tag, copy and paste it to fill the rest of the page.
- Select your grouped tag.
- Press “Ctrl+C” (or “Command+C” on a Mac) to copy the tag.
- Press “Ctrl+V” (or “Command+V” on a Mac) to paste the tag.
- Repeat step 3 until you have filled the page with as many tags as possible, leaving some space between each tag for cutting.
 the finished custom label in Microsoft Word
3.12. Print Your Tags
Once you’re satisfied with the layout of your tags, it’s time to print them.
- Go to the “File” tab.
- Click on “Print.”
- Select your printer and adjust the settings as needed (e.g., paper quality, color options).
- Click “Print” to print your tags.
3.13. Cut and Prepare Your Tags
After printing, carefully cut out each tag using scissors or a paper cutter. Use a hole punch to create a hole at the top of each tag, and attach them to your gifts with ribbon, string, or twine.
4. Creative Ideas for Gift Tag Designs
Now that you know how to make gift tags on Word, let’s explore some creative ideas for designing tags that are tailored to different occasions and recipients:
- Elegant Monogram Tags: Create tags with the recipient’s initials in an elegant font, surrounded by a decorative border. This is perfect for adding a sophisticated touch to gifts for lawyers.
- Themed Tags for Lawyers: Design tags with legal motifs, such as gavels, scales of justice, or law books. Use colors like gold, navy, and burgundy to convey a sense of professionalism and authority.
- Holiday-Themed Tags: Create festive tags with holiday-related images, colors, and messages. Use shapes like Christmas trees, snowflakes, or dreidels, and add glitter or metallic accents for a touch of sparkle.
- Birthday-Themed Tags: Design colorful and playful tags with birthday-related images, such as balloons, cakes, or candles. Use bright colors and fun fonts to create a celebratory mood.
- Thank You Tags: Create simple and elegant tags with a “Thank You” message, surrounded by a decorative border or floral design. Use soft colors and graceful fonts to express your gratitude.
- Rustic Kraft Paper Tags: Create tags with a rustic, handmade look by using kraft paper as the background and adding simple, hand-drawn designs. Use twine or jute to attach the tags to your gifts for a natural, earthy feel.
- Photo Tags: Insert a small photo of the recipient or a relevant image into your gift tag design. This is a great way to personalize your gifts and create a lasting impression.
- Calligraphy Tags: Practice your calligraphy skills by writing the recipient’s name or a special message on the gift tag in beautiful, flowing script. This adds a personal and artistic touch to your gifts.
- Minimalist Tags: Create simple and understated tags with a clean design and minimal text. Use a neutral color palette and a modern font to convey a sense of sophistication and elegance.
No matter what design you choose, remember to keep the recipient’s personality and preferences in mind. The more thoughtful and personalized your gift tags are, the more appreciated they will be.
5. Tips for Printing High-Quality Gift Tags
To ensure that your gift tags look their best, follow these tips for printing high-quality results:
- Use High-Quality Paper: Choose a heavy-weight paper stock, such as card stock or photo paper, for a more durable and professional-looking tag.
- Adjust Printer Settings: Select the appropriate paper type and print quality settings in your printer’s menu. Experiment with different settings to find the optimal combination for your printer and paper.
- Print a Test Page: Before printing a full sheet of tags, print a test page to ensure that the layout and colors are accurate.
- Use a Sharp Cutting Tool: Use a sharp pair of scissors or a paper cutter to create clean, precise cuts around the edges of your tags.
- Consider Professional Printing: If you need a large quantity of gift tags or want a truly professional finish, consider using a professional printing service. They can offer a wider range of paper stocks, finishes, and printing options.
6. How to Incorporate Your Brand into Gift Tags
For law firms and corporate events, incorporating your brand into gift tags can be a great way to reinforce your company’s identity and create a lasting impression. Here are some tips for incorporating your brand into your gift tag designs:
- Use Your Logo: Include your company logo on the gift tag, either as the main design element or as a subtle accent.
- Use Your Brand Colors: Use your company’s brand colors in the tag’s background, text, and borders.
- Use Your Brand Font: Use your company’s brand font for the text on the gift tag.
- Include Your Website or Social Media Handles: Add your company’s website or social media handles to the gift tag to drive traffic to your online channels.
- Create a Consistent Look: Ensure that your gift tags are consistent with your other marketing materials in terms of design, color palette, and messaging.
By incorporating your brand into your gift tags, you can create a cohesive and professional look that reinforces your company’s identity and values.
7. Finding Inspiration for Your Gift Tag Designs
If you’re feeling stuck for ideas, there are plenty of places to find inspiration for your gift tag designs:
- Online Design Galleries: Browse online design galleries like Pinterest, Behance, and Dribbble for examples of creative and visually appealing gift tags.
- E-commerce Websites: Check out e-commerce websites like Etsy and Amazon to see what types of gift tags are popular and trending.
- Social Media: Follow design-related accounts on social media platforms like Instagram and Facebook for a daily dose of inspiration.
- Design Blogs: Read design blogs and articles for tips, tutorials, and inspiration on creating beautiful gift tags.
- Printable Templates: Use printable gift tag templates as a starting point for your designs. You can find free and premium templates online that you can customize to your liking.
8. Advanced Techniques for Gift Tag Design
Once you’ve mastered the basics of creating gift tags on Word, you can explore some advanced techniques to take your designs to the next level:
- Mail Merge: Use Word’s mail merge feature to create personalized gift tags for a large number of recipients. This is especially useful for corporate events or holiday mailings.
- Custom Graphics: Create your own custom graphics and illustrations to use on your gift tags. This allows you to create truly unique and one-of-a-kind designs.
- Layering and Die-Cutting: Print your gift tags on multiple layers of paper and use a die-cutting machine to create intricate shapes and designs.
- Embossing and Letterpress: Add texture and dimension to your gift tags by using embossing or letterpress techniques.
- Hand-Lettering and Calligraphy: Incorporate hand-lettering or calligraphy into your gift tag designs for a personal and artistic touch.
By exploring these advanced techniques, you can create gift tags that are truly works of art.
9. Gift Tag Etiquette for Lawyers and Legal Professionals
When giving gifts to lawyers or legal professionals, it’s important to follow certain etiquette guidelines to ensure that your gift is well-received and appropriate. Here are some tips for gift tag etiquette:
- Be Professional: Use a professional and respectful tone in your gift tag message. Avoid overly casual or familiar language.
- Be Specific: Clearly state the reason for the gift (e.g., “Thank you for your hard work,” or “Happy Birthday”).
- Keep it Concise: Keep your gift tag message brief and to the point. Avoid lengthy or rambling messages.
- Proofread Carefully: Proofread your gift tag message carefully for any spelling or grammatical errors.
- Consider the Occasion: Tailor your gift tag message to the specific occasion. For example, a holiday gift tag should have a festive and celebratory tone.
- Avoid Controversial Topics: Avoid discussing controversial or sensitive topics on your gift tag.
- Be Mindful of Cultural Differences: Be aware of any cultural differences or sensitivities that may affect the appropriateness of your gift tag message.
- Personalize When Appropriate: While maintaining a professional tone, personalize your gift tag message with a personal anecdote or inside joke (if appropriate for your relationship with the recipient).
By following these gift tag etiquette guidelines, you can ensure that your gift is well-received and appreciated by the recipient.
10. Frequently Asked Questions (FAQs) About Making Gift Tags on Word
Here are some frequently asked questions about how to make gift tags on Word:
10.1. Can I use pre-designed templates in Word to create gift tags?
Yes, Microsoft Word offers a variety of pre-designed templates that you can use as a starting point for creating gift tags. To access these templates, go to “File” > “New” and search for “gift tags” in the online templates library.
10.2. What is the best paper to use for printing gift tags?
The best paper to use for printing gift tags is a heavy-weight card stock or photo paper. These paper types are more durable and provide a more professional-looking finish.
10.3. How do I add a hole to my gift tags for attaching ribbon or string?
To add a hole to your gift tags, use a hole punch to create a small hole at the top of each tag. You can also add a small circle to your gift tag design to indicate where the hole should be punched.
10.4. Can I use different fonts and colors on my gift tags?
Yes, you can use different fonts and colors on your gift tags to create a personalized and visually appealing design. Use the formatting options in the “Home” tab of Microsoft Word to change the font, size, color, and style of your text.
10.5. How do I make sure my gift tags are aligned correctly when I print them?
To ensure that your gift tags are aligned correctly when you print them, print a test page first to check the layout and alignment. You can also adjust the margins and page layout settings in Microsoft Word to fine-tune the placement of your gift tags on the page.
10.6. Can I add images or logos to my gift tags?
Yes, you can add images or logos to your gift tags by using the “Insert” > “Pictures” option in Microsoft Word. You can then resize and position the image or logo as needed.
10.7. How do I save my gift tag design so I can use it again later?
To save your gift tag design, go to “File” > “Save As” and choose a location and file name for your design. Save the file as a “.docx” file so you can open and edit it later in Microsoft Word.
10.8. Can I print different designs on the same sheet of gift tags?
Yes, you can print different designs on the same sheet of gift tags by creating multiple gift tag designs in your Word document and arranging them on the page as desired.
10.9. How do I make my gift tags look more professional?
To make your gift tags look more professional, use high-quality paper, print at a high resolution, use clean and simple designs, and pay attention to detail. You can also consider using professional printing services for a truly polished finish.
10.10. What are some creative ways to use gift tags?
Gift tags can be used for more than just labeling gifts. You can also use them as place cards at a dinner party, as decorative accents on a scrapbook page, or as mini thank you notes.
Conclusion: Elevate Your Gift-Giving with Custom Tags
Learning how to make gift tags on Word empowers you to add a personal and professional touch to any gift. Whether you’re celebrating a special occasion, expressing gratitude, or reinforcing your brand, custom-made gift tags can make a lasting impression. Visit lawyergift.com for more unique gift ideas and inspiration for lawyers and legal professionals. Explore our diverse collection of gifts, find the perfect present, and elevate your gift-giving with custom tags that reflect your thoughtfulness and attention to detail.
Ready to create your own stunning gift tags? Head over to lawyergift.com now and discover the perfect gift to pair them with! Browse our categories, search by occasion or interest, and contact us for personalized recommendations. Let us help you make every gift unforgettable!
Address: 3210 Wisconsin Ave NW, Washington, DC 20016, United States.
Phone: +1 (202) 624-2500.
Website: lawyergift.com.
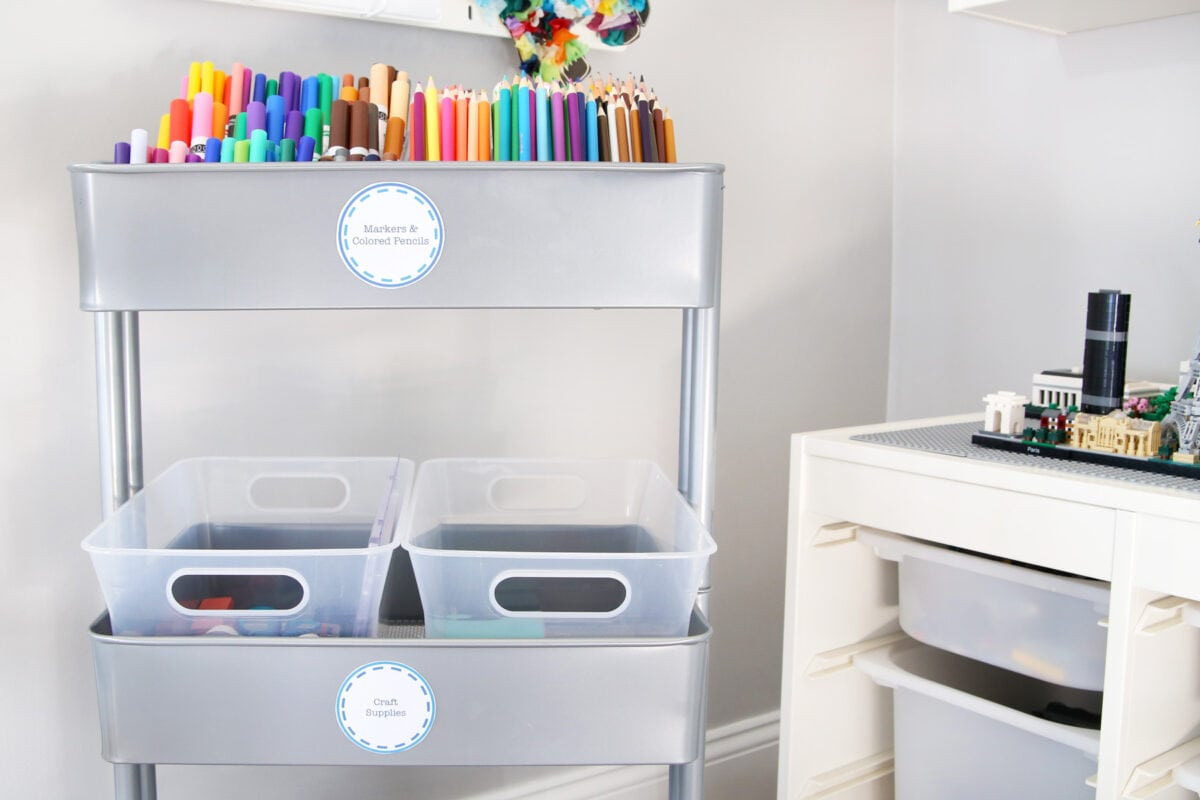 Rolling Cart with Round Labels that Were Made in Microsoft Word
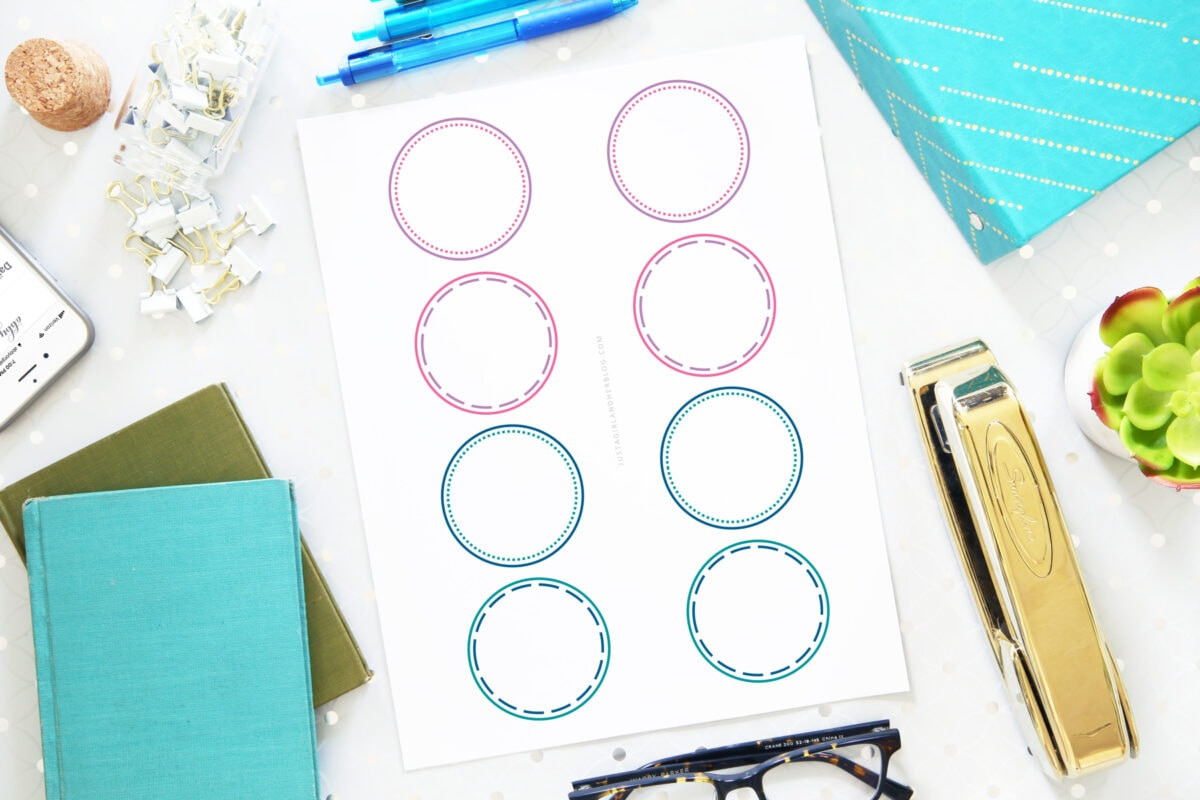 Simple Printable Labels, Created in Microsoft Word